ArgoCD is a powerful tool that streamlines the continuous delivery process for Kubernetes applications. Its GitOps-centric approach ensures that your cluster’s state is always aligned with your Git repository, providing a reliable, auditable, and scalable deployment process. By following this tutorial, you’ve set up ArgoCD, deployed a sample application, and learned how to leverage its key features. As you continue to explore ArgoCD, you’ll discover more advanced capabilities, such as aaaa
Introduction
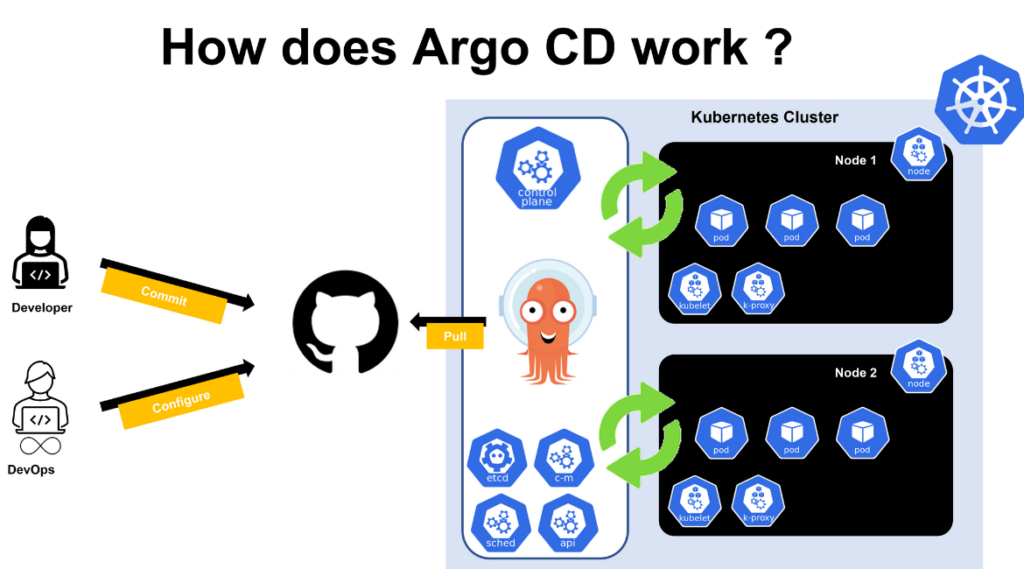
ArgoCD is an open-source, declarative continuous delivery tool designed specifically for Kubernetes environments. It employs GitOps principles to automate and manage application deployments, making it an invaluable asset for DevOps teams working with containerized applications

Key Features of ArgoCD
- Declarative GitOps: ArgoCD allows you to manage Kubernetes clusters using Git repositories as the source of truth for declarative configurations.
- Automatic Syncing: ArgoCD continuously monitors the Git repositories for changes and automatically syncs them to the target Kubernetes clusters.
- Application Management: ArgoCD provides a web-based UI for managing and visualizing the state of your Kubernetes applications.
- Multi-Cluster Support: It supports managing multiple Kubernetes clusters from a single ArgoCD instance.
- RBAC and SSO: ArgoCD integrates with various authentication providers for single sign-on (SSO) and provides role-based access control (RBAC) for managing permissions.
- Helm and Kustomize Support: ArgoCD natively supports Helm and Kustomize, making it easy to deploy complex Kubernetes applications.
Uses of ArgoCD
ArgoCD simplifies the process of managing Kubernetes applications by providing a clear and auditable workflow for application deployment. With ArgoCD, you can:
- Ensure consistency between your Git repository and Kubernetes clusters.
- Automate deployments while maintaining control through manual sync options.
- Monitor and rollback changes easily, improving the reliability of your deployments.
Getting Started With ArgoCD: A Practical Tutorial
In this tutorial, we’ll walk through the steps to set up ArgoCD on a Kubernetes cluster and deploy a sample application using a GitOps approach.
Prerequisites
- A Kubernetes cluster (You can use Minikube, kind, or any managed Kubernetes service like EKS, GKE, or AKS).
- kubectl installed and configured to access your cluster.
- A GitHub account for hosting your application’s manifest.
Step 1: Install ArgoCD
First, we need to install ArgoCD in our Kubernetes cluster.
1.Create the argocd namespace:kubectl create namespace argocd
kubectl create namespace argocd2.Install ArgoCD using the official manifest:
kubectl apply -n argocd -f https://raw.githubusercontent.com/argoproj/argo-cd/stable/manifests/install.yaml
3.Verify the installation:
kubectl get pods -n argocd
You should see several pods running in the argocd namespace, indicating that ArgoCD has been successfully installed.
Step 2: Accessing the ArgoCD UI
ArgoCD comes with a web-based user interface for managing applications. To access it, follow these steps:
1.Forward the ArgoCD server service port to your local machine:
kubectl port-forward svc/argocd-server -n argocd 8080:4432.Login to ArgoCD: The default username is admin. You can retrieve the initial password with:
kubectl get secret argocd-initial-admin-secret -n argocd -o jsonpath="{.data.password}" | base64 -dOpen your browser and go to https://localhost:8080. Use the username admin and the password obtained above to log in.
Step 3: Deploying an Application With ArgoCD
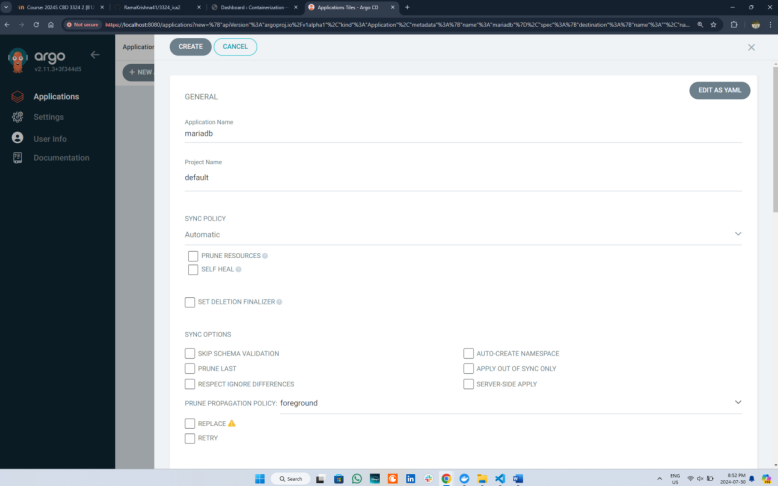
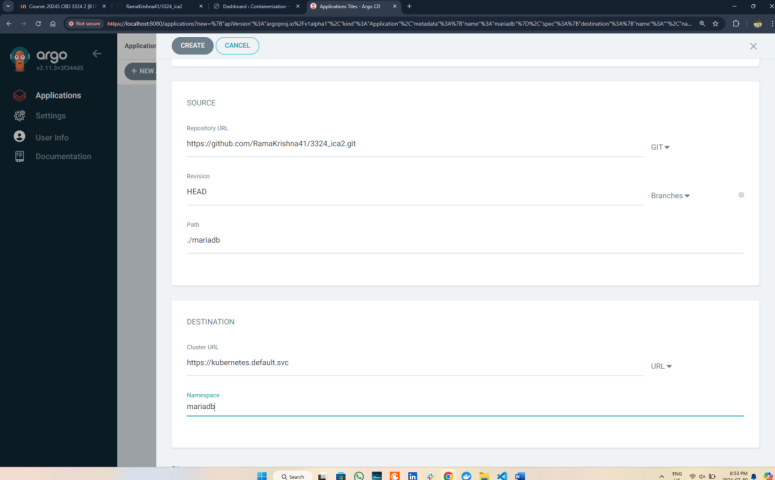
Now, let’s deploy a sample application using ArgoCD.
- Fork a sample repository: Fork this sample GitHub repository to your own GitHub account. This repository contains various Kubernetes application manifests.
- Create a new ArgoCD application:
- In the ArgoCD UI, click on “New App.”
- Fill in the application details:
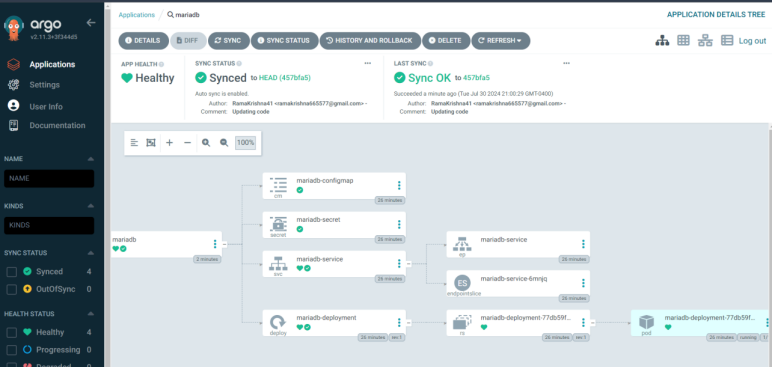
- Application Name: mariadb
- Project:
default - Sync Policy:
Manual - Repository URL: URL of your forked repository
- Path:
guestbook - Cluster:
https://kubernetes.default.svc - Namespace:
default
- Click “Create” to create the application.
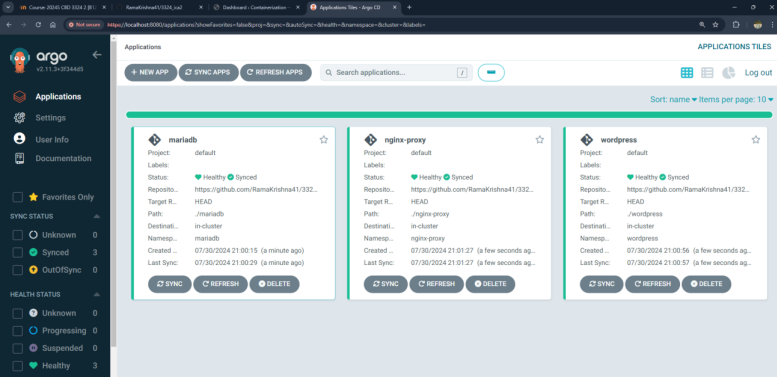
- Sync the Application: After the application is created, click “Sync” to deploy it to your Kubernetes cluster. ArgoCD will pull the manifests from your Git repository and apply them to the cluster.
- Verify the Deployment: You can verify that the application is running by using kubectl:
kubectl get pods -n default
You should see pods related to the guestbook application running.
Step 4: Automating Sync with ArgoCD
By default, ArgoCD requires manual intervention to sync changes. To automate this process:
- Enable Auto-Sync:
- Go to the ArgoCD UI, select your application, and click on “App Details.”
- In the “Sync Policy” section, check “Automatic.”
- Test the Auto-Sync: Make a change in your Git repository (e.g., update the image version in the manifest). Commit and push the change. Argo CD will automatically detect this and sync the change to your cluster.
Conclusion
ArgoCD is a powerful tool that streamlines the continuous delivery process for Kubernetes applications. Its GitOps-centric approach ensures that your cluster’s state is always aligned with your Git repository, providing a reliable, auditable, and scalable deployment process. By following this tutorial, you’ve set up ArgoCD, deployed a sample application, and learned how to leverage its key features. As you continue to explore ArgoCD, you’ll discover more advanced capabilities, such as managing multiple clusters, integrating with CI/CD pipelines, and customizing sync behaviors.


